In this guide
- What Is a Workflow in GoHighLevel?
- Where Do You Find the Workflow Builder and How Do You Start?
- How Do Workflow Triggers Work?
- Which Workflow Actions Should You Learn First?
- How Do Wait Steps Work in GoHighLevel?
- How Do You Add If/Else Branches and Goal Events?
- Which Workflow Settings Should You Change Before Publishing?
- Walkthrough: How to Build a Form Submitted to Booked Call Workflow
- How Do You Test and Publish a Workflow?
- How Should You Name and Organize Workflows?
- What Mistakes Break GoHighLevel Workflows?
- Should You Build Workflows Yourself or Get Help?
- Frequently Asked Questions About Building Workflows in GoHighLevel
- Start Building Workflows That Book Calls
To build a workflow in GoHighLevel, open Automation, go to the Workflows tab and click Create Workflow. Pick a trigger (the event that starts it, such as a form submission), add actions (texts, emails, tags, pipeline moves), control timing with wait steps, branch with If/Else, then test with a real contact and switch the workflow from Draft to Publish.
That sounds simple until a real lead hits it. A plumber fills in your quote form at 9:40 at night, gets three identical texts, receives a booking link to the wrong calendar, and your team never hears about it because the notification went to an old email address. Nothing in that chain is a software bug. Every step was set up exactly as clicked. The problem is that nobody planned the logic, checked the settings or tested the path before publishing.
This guide walks you through the HighLevel workflow builder the way we use it: triggers and their filters, the actions that matter, wait steps, If/Else branches, goal events and the settings most people skip. Then we build one real workflow end to end, from form submitted to booked call, and show you how to test it and read the logs. It comes from the iBoostin team’s hands-on builds in client accounts every week. New to the platform? Start with what GoHighLevel is and how it works.
Key takeaways
- Every workflow is a trigger plus a chain of actions. Wait steps control timing, If/Else controls who gets what, and a goal event lets contacts jump ahead when they do what you wanted.
- Trigger filters matter as much as the trigger. A Form Submitted trigger with no form filter fires on every form in the account.
- Open the Settings tab before you publish. Allow Re-entry, Stop on Response, the time window and sender details change how the whole workflow behaves.
- Use the Test Workflow button, then run a live test with your own contact and read the Execution Logs line by line.
- A clear naming pattern and folders save hours once an account has more than a dozen workflows.
What Is a Workflow in GoHighLevel?
A workflow in GoHighLevel is a set of automated steps that runs for a contact when something happens. Something happens (the trigger), and then the system does things in order (the actions): sends a text, waits a day, checks whether the lead booked, moves their deal to a new stage, tells your team. Each contact moves through the workflow on their own path and at their own pace.
Workflows replaced the older Campaigns and Triggers tools that long-time users remember. Everything that used to be split between those two now lives in one visual builder, where you can see the whole path on a canvas, drag steps around and branch the flow. If you see an old tutorial that talks about building a campaign and then attaching a trigger to it, the logic still applies, but the screens no longer exist.
The five building blocks of every workflow
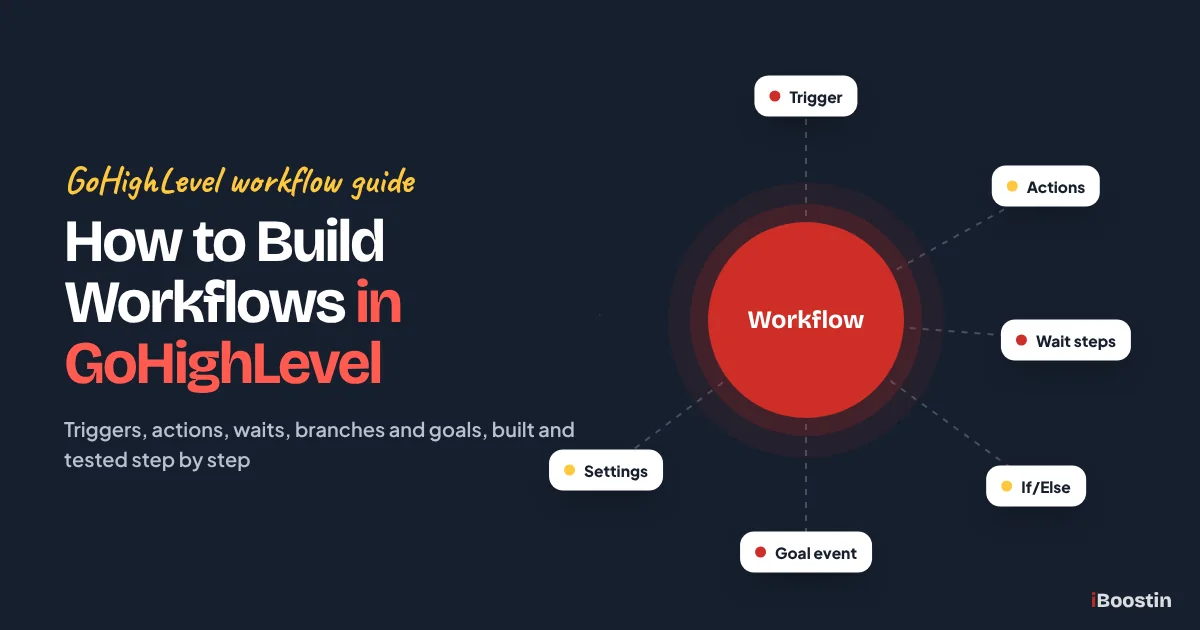
Almost every workflow we build uses the same five pieces. The trigger decides who enters and when. Actions do the work. Wait steps add time or pause until something happens. If/Else branches send different contacts down different paths. A goal event watches for the result you want, such as a booked appointment, and pulls the contact forward to the end when it happens.
Once you think in those five pieces, any workflow becomes easy to plan on paper first. Write the trigger at the top, list the actions in order, mark where you need to wait, and circle the points where the path should split. If you can draw it on a napkin, you can build it in ten minutes. If you cannot draw it, the builder will not fix the confusion for you.
How a contact moves through a workflow
When the trigger fires, the contact is enrolled and starts at the first action. They move down one step at a time. At a wait step they sit until the time passes or the event happens. At an If/Else they are checked once against your conditions and sent down the matching branch. When they reach the end, or a Remove from Workflow action, or a goal event set to end the workflow, they leave.
Two things surprise new builders. First, edits apply to upcoming steps for contacts already inside, but a contact sitting in a wait keeps the wait it started with, even if you change that wait later. Second, a contact who is still active in a workflow cannot enter it again until they finish, even with re-entry turned on. Both rules explain a lot of the strange behavior people report in their first month.
Where Do You Find the Workflow Builder and How Do You Start?
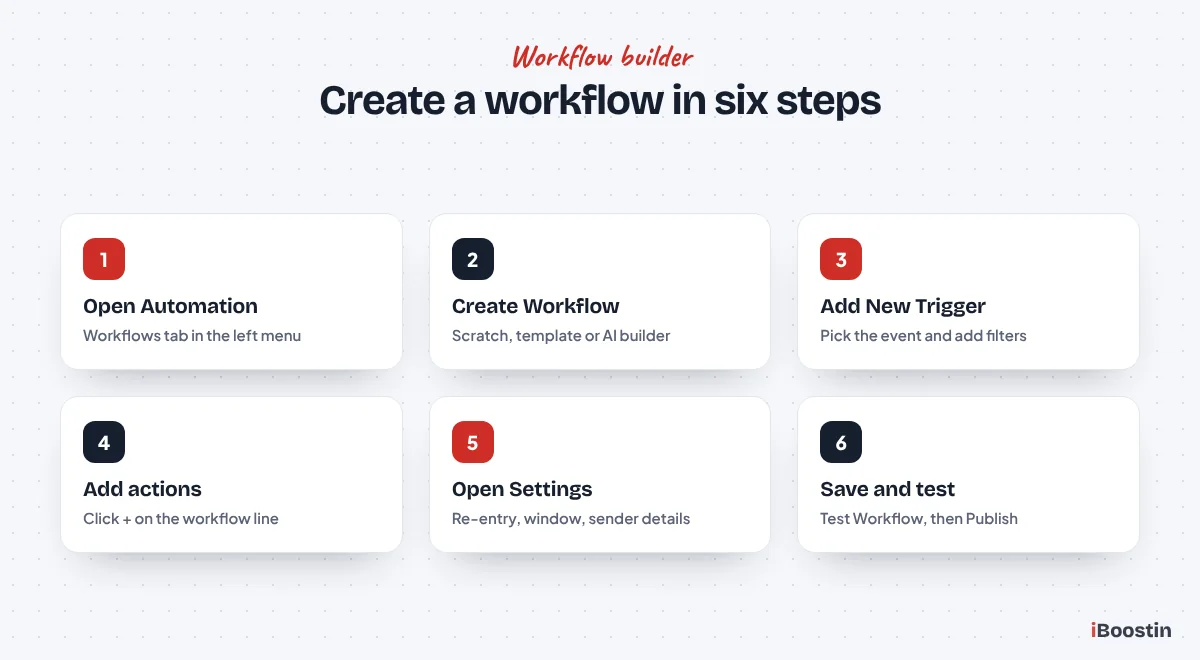
The builder lives inside each sub-account, not at the agency level. Here is the click path in a current account:
- Log in to the sub-account you want to automate.
- Click Automation in the left menu (some accounts label it Automations).
- Open the Workflows tab. You will see your existing workflows, any folders and the options to create new ones.
- Click Create Workflow and choose how to start: from scratch, from a template, or with the AI builder.
- Rename the workflow at the top of the builder before you do anything else.
- Click Add New Trigger, then use the + on the line below it to add actions.
- Open the Settings tab, then Save, Test Workflow and finally switch the toggle from Draft to Publish.
HighLevel has redesigned this landing page more than once, and some accounts see a prompt box for the AI builder at the top with template categories below it. The button names above are current at the time of writing, but if a label looks slightly different in your account, the order of steps stays the same.
Starting from scratch
Starting from scratch gives you an empty canvas with a trigger slot at the top and an end marker at the bottom. This is the option we use for nearly every client build, because it forces you to make each decision on purpose: which form, which pipeline, which sender number, which wait. Nothing hides inside the workflow that you did not put there.
The downside is that it takes longer the first time, and it is easy to forget a piece such as an internal notification or a stage update. That is why we plan on paper first and keep a short checklist next to the screen. After you have built three or four workflows from scratch, you will be faster than any template, because you will know exactly where every setting lives.
Starting from a template or recipe
HighLevel ships prebuilt workflows, often called recipes or templates, for common jobs such as lead nurture, appointment confirmation and onboarding. Open the template library from the Workflows page, preview a template, read its description and prerequisites, then click Continue to load it into the builder. Each template shows its triggers and actions on the canvas before you commit.
Treat templates as a sketch, not a finished system. They come with placeholder messages, generic timing and triggers that still need a form, calendar or tag picked. In the accounts we audit, a large share of broken workflows started as templates that were published with an empty filter or the default copy still in place. Load the template, then go through every single step as if you had built it yourself.
Starting with the AI builder
The Workflow AI builder turns a plain-English prompt into a draft workflow. You describe what you want (“when the contact form is submitted, text them my booking link, wait a day, and if they have not booked, send an email”) and it creates the trigger, actions and branches, matching your existing forms, tags and pipelines by name where it can. It can also adjust common settings such as re-entry and the time window.
HighLevel’s own help article says the AI cannot test workflows and that results need manual review before publishing. That matches what we see. The AI builder is a quick way to get a first draft on the canvas, but you still need to open every step, check every filter and run a live test. Availability can depend on your account and on whether the agency has the feature turned on in Labs.
How Do Workflow Triggers Work?
A trigger is the event that enrolls a contact. You add it with Add New Trigger, pick it from a searchable list grouped into categories (Contact, Events, Appointments, Opportunities, Payments and more), give it a clear name and then add filters. There are dozens of triggers, but a handful cover most small business automations.
Every trigger has its own filter options. Filters narrow the trigger so it fires only for the right contacts: a specific form, a specific tag, a specific calendar or pipeline stage. A trigger without filters is the single most common reason a workflow fires for people it should never touch.
Form Submitted
Form Submitted fires when someone submits a form built in HighLevel. The key filter is Form Is, where you choose the exact form. If your account has a contact form, a quote form and a newsletter form, and you leave this filter empty, every one of them will start the workflow. This is the trigger we use most for lead capture, because it gives you the cleanest starting point and the submitted answers are available as merge fields in later steps.
Two limits to know. The trigger only works with forms built inside HighLevel, so a form on a WordPress plugin or a third-party form tool needs an integration or a webhook to get data in. And it fires on every submission, so a person who submits twice may be enrolled twice if re-entry is on. Surveys and quizzes have their own triggers (Survey Submitted and Quiz Submitted), so pick the right one.
Contact Tag
Contact Tag fires when a tag is added to or removed from a contact. You choose the tag and whether you are watching for added or removed. Tags are the glue between workflows: one workflow adds a tag such as “lead-hot”, and a second workflow that starts on that tag takes over. This keeps each workflow short and readable instead of one giant canvas.
Tags are also how you start a workflow manually. Add the tag to a contact by hand or in bulk from a smart list, and the workflow runs for them. The risk is tag sprawl: after a year, accounts often have hundreds of near-duplicate tags such as “Hot Lead”, “hot-lead” and “hotlead”. Pick one naming style, lowercase with hyphens works well, and stick to it.
Customer Replied
Customer Replied fires when a contact sends you a message. Its filters are richer than most: Reply Channel (SMS, email, Facebook, Instagram, chat and others), Contains Phrase, Exact Match Phrase, Has Tag and Doesn’t Have Tag, Intent Type and Replied to Workflow, which limits the trigger to replies to a specific workflow’s messages.
We use it for keyword replies (“reply YES to confirm”), for routing replies to the right person, and for pulling engaged leads out of a cold sequence into a hot one. Be careful with Contains Phrase on common words. A filter on “yes” will also match “yes but not this week” and “I said yes already, stop texting me”. Test it with real wording your customers use before you trust it.
Customer Booked Appointment and Appointment Status
Customer Booked Appointment fires when a contact books on one of your calendars, with filters such as the calendar. Appointment Status fires when an appointment changes status, for example to confirmed, cancelled, showed, no-show or rescheduled. Use the first for confirmations and reminders, and the second for no-show recovery, reschedule messages and post-visit review requests.
Two behaviors are worth memorizing. Workflows with appointment triggers let a contact enter once per appointment, regardless of the Allow Re-entry setting, because one person can book several times. And recurring appointments do not enroll contacts through Customer Booked Appointment, so if you run weekly recurring sessions, plan a different trigger. If you are still setting up the calendars themselves, our GoHighLevel calendar and booking setup page shows what a clean calendar build includes.
Pipeline Stage Changed and other opportunity triggers
Pipeline Stage Changed fires when an opportunity moves into a stage you choose, in the pipeline you choose. It is how you attach automation to your sales process: when a deal moves to “Quote Sent”, start the quote follow-up; when it moves to “Won”, start onboarding. Opportunity Created, Opportunity Status Changed and Stale Opportunities cover the other common moments, such as a deal going cold for a set number of days.
These triggers are where the Allow multiple Opportunities setting matters. If a contact can have more than one deal open at a time, that setting decides whether each deal gets its own run through the workflow or only the first one does. For sales teams that work several jobs per customer, turn it on and test it with two opportunities on the same contact.
Inbound Webhook
Inbound Webhook gives you a unique URL. When another system sends data to that URL, the workflow starts and the data becomes available to map into contact fields. It is how you connect tools that have no native HighLevel integration: an outside form builder, a booking system, a lead vendor or your own app.
The first time you set it up, you send a sample request so HighLevel can read the fields, then you map them in a Create Contact or Update Contact Field action. HighLevel marks some advanced steps, including webhook features, as premium, and they may be billed per run depending on your plan, so check current pricing in your account before you build volume on them.
How trigger filters work
Each trigger has its own filter options inside its settings panel, and the list depends on the trigger. Contact Tag filters by tag, Form Submitted by form, Pipeline Stage Changed by pipeline and stage, Customer Replied by channel and phrase. Many triggers also let you filter by tags the contact has or does not have, which is how you exclude existing customers or staff from a lead workflow.
Our habit: every trigger gets at least one filter, even when the account only has one form today. Next month someone will add a second form, and the unfiltered workflow will quietly start texting newsletter subscribers about a free quote. A filter costs ten seconds and saves a support ticket.
Using more than one trigger
You can add several triggers to one workflow, and each one enrolls contacts independently when its own conditions are met. A common example is a lead workflow that starts on Form Submitted for the website form, Facebook Lead Form Submitted for ads and Contact Tag for leads your team adds by hand. All three feed the same follow-up, so you only maintain the messages once.
Multiple triggers act as OR, not AND. A contact does not need to meet all of them, only one. If you need AND logic, such as “form submitted and has the tag commercial”, put the second condition in that trigger’s filters or in an If/Else right after the trigger. Name each trigger clearly so the execution logs tell you which door a contact came through.
Which Workflow Actions Should You Learn First?
Click the + on the line under your trigger and the action menu opens, grouped into categories: Contact, Communication, Send Data, Internal Tools, Appointments, Opportunities, Payments, Marketing and more. You do not need most of them on day one. These are the ones that do the real work in a lead or booking workflow.
Send SMS and Send Email
Send SMS and Send Email are the core communication actions. Both support merge fields such as {{contact.first_name}}, so a message reads like it was typed for that person. Email also supports saved templates and a subject line, and either action can override the workflow’s default sender name, email or number. Keep texts short and plain: one idea, one link, a name at the end.
Two setup items sit outside the workflow but decide whether these actions work. US texting from a local number needs carrier approval, which our guide on how to register for A2P 10DLC in GoHighLevel covers step by step. Email needs a dedicated sending domain with proper DNS records, or your messages risk the junk folder, as explained in why GoHighLevel emails land in spam. Other channels such as WhatsApp, Facebook Messenger, Instagram DM and Google Business messaging have their own actions with their own rules.
CRM updates: opportunities, tags, fields and owners
Create/Update Opportunity creates a deal in the pipeline and stage you choose, or moves an existing one. Add Contact Tag and Remove Contact Tag label the contact. Update Contact Field writes a value into a standard or custom field. Assign to User gives the lead an owner, which also controls who receives “assigned user” notifications later in the flow.
These actions are what turn a workflow from a message blaster into a system. When every new lead lands in the “New Lead” stage with a source tag and an owner, your pipeline becomes a live picture of the business instead of a list someone updates on Fridays. If your pipelines and custom fields are not planned yet, sort that out before you automate on top of them. Our GoHighLevel CRM setup page explains what that groundwork looks like.
Internal notifications and tasks
Send Internal Notification alerts your team by email, SMS or an in-app notification, depending on what you choose. You can send it to the assigned user, specific users or a custom address, and the message can include merge fields such as the lead’s name, phone and form answers. Add Task creates a to-do on the contact for a user, with a title, description and due time.
We put a notification in almost every lead workflow, because automation should start the conversation and a person should close it. A good internal alert answers three questions in the first line: who is this, what did they ask for, and what should I do now. “New consult request: Sarah Lee, roof leak, call within 15 minutes” gets a faster response than “New form submission”.
Webhooks and outside tools
The Webhook action sends contact data out of HighLevel to another system when the contact reaches that step. You enter the URL, keep the default POST method or change it, and add custom key and value pairs, which can use merge fields. By default the payload includes standard contact data, and appointment or opportunity details are included when the trigger relates to them. The Custom Webhook action gives more control over the request for more technical connections.
Use webhooks when a tool has no direct integration: sending won deals to an accounting app, posting new leads to a team chat tool, or updating a spreadsheet through an automation service. When you test, HighLevel’s execution logs confirm the request was sent but do not show the full payload, so point the webhook at a request-inspection tool first, check the data, then switch to the real URL.
Internal tools: Go To, Split, Drip Mode and Remove from Workflow
The Internal Tools group holds the logic actions. If/Else, Wait and Goal Event get their own sections below. Go To jumps a contact to another step in the same workflow, useful for loops such as “ask again in a week”. Split divides contacts into percentage paths for A/B testing message copy. Drip Mode releases contacts in batches, which protects your sending reputation when you add a big list at once. Remove from Workflow takes the contact out of this or another workflow.
Remove from Workflow is the quiet hero of clean builds. When a lead books, you want them out of the nurture sequence, the no-reply chaser and the reactivation campaign. One action at the start of your booking workflow that removes them from those three prevents the classic mistake of texting someone “still interested?” an hour after they booked.
How Do Wait Steps Work in GoHighLevel?
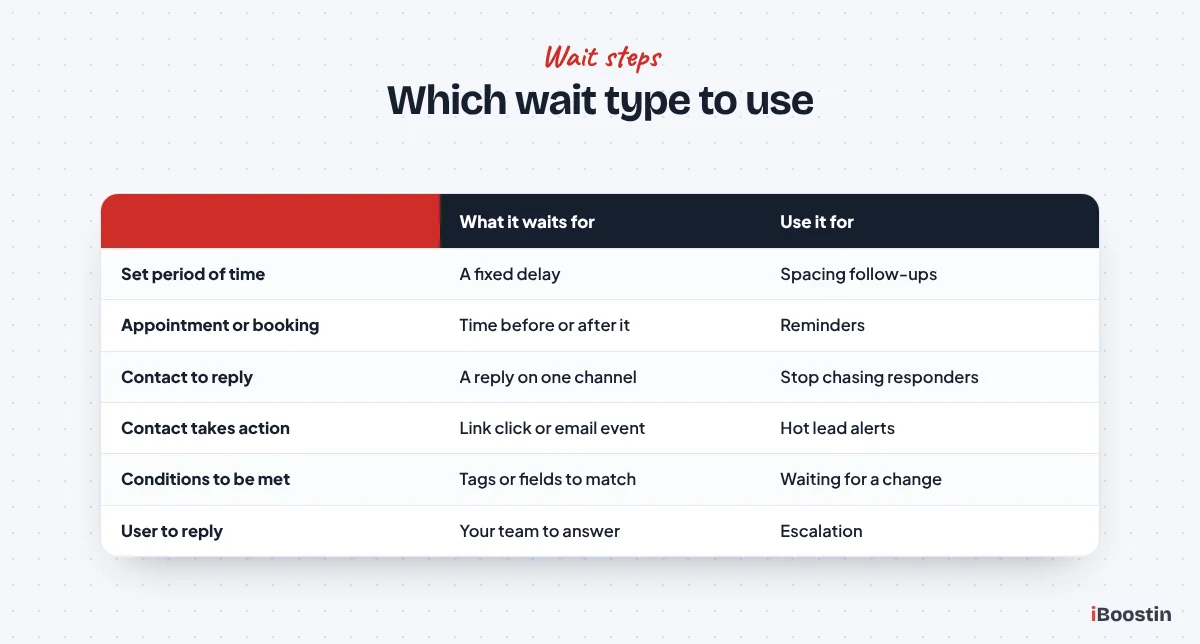
The Wait action controls time and patience in a workflow. It is not just a delay. When you add one, HighLevel asks what you want to wait for, and each option behaves differently. Picking the right type is the difference between a polite follow-up and a message that lands at 2 a.m. or never arrives.
Waiting a set period of time
A set period of time holds the contact for minutes, hours or days. Turn on Advance Window to control when they resume: specific weekdays and a range of hours. That means “wait 1 day” can become “wait 1 day, then send only between 9 a.m. and 6 p.m. on weekdays”, which stops follow-ups from going out on Sunday morning.
Use short waits generously. A one or two minute wait right after the trigger gives the system time to finish creating the contact, writing form answers to fields and creating the opportunity before later steps read them. It is not a fix for every race condition, but in our builds it removes a whole class of “the field was empty when the If/Else checked it” problems.
Waiting for an appointment, booking or date
An upcoming appointment or booking waits relative to the contact’s appointment: at the scheduled time, or a set number of days, hours or minutes before or after it. This is how reminder workflows work: wait until 24 hours before, send a reminder, wait until 2 hours before, send another. A specific date and time and A recurring schedule handle fixed dates and repeating patterns.
Each of these has a setting for what to do if the date has already passed, such as when someone books for tomorrow and your first reminder is set for 48 hours before. Options include continuing to the next action, going to a specific step, exiting the contact, or skipping outbound messages until the next wait. Set this on purpose. The default can send a “your appointment is in two days” message to someone booked for this afternoon.
Waiting for the contact to reply
The contact to reply pauses until the contact answers on a channel you choose, such as SMS or email. It must come after a Send action. Turn on the Timeout and you get two paths: one for contacts who replied, and one for contacts who did not reply before the timeout ran out. That single step replaces a messy If/Else and is the cleanest way to stop chasing people who already answered.
One known catch: SMS has no threading. If a team member texts the contact by hand while they sit in this wait, the reply may not be linked to the automated message, and the contact can stay stuck. HighLevel’s own guidance is not to send manual texts to contacts inside a wait-for-reply step. Train your team on that, or give them a tag to add that removes the contact from the workflow first.
Waiting for an action, a condition or your team
The contact to take an action waits for a trigger link click or an email event such as an open or click. Specific conditions to be met waits until fields, tags or other conditions become true, with AND or OR logic. A user to reply waits for your team to answer the contact, which is the basis for escalation: if nobody replies within 30 minutes, notify the manager.
All three support a timeout, and you should almost always use it. A condition wait with no timeout can hold a contact forever if the condition never becomes true. In audits we regularly find contacts who have been sitting in the same wait for months because a tag was renamed. A timeout path gives every contact a way out, even if that way is just an internal note and the end of the workflow.
How Do You Add If/Else Branches and Goal Events?
Branches and goals are where a workflow starts to think. If/Else checks a contact at one moment and sends them down the matching path. A goal event watches all the time and moves the contact forward the moment they hit the result you want. Most good lead workflows use both.
Building an If/Else branch
Click +, choose If / Else, then Build My Own (or start from one of the prebuilt condition sets). Each branch has a name and one or more conditions: pick a field such as a tag, a contact field, an appointment detail or an opportunity stage, choose an operator and set a value. Add Segment adds another condition and the AND or OR switch controls how they combine. Add Branch creates another separate path.
HighLevel always adds a None branch for contacts who match no condition. You cannot delete it or give it conditions, but you can rename it and add actions. Name it something like “Everyone else” and give it a real fallback, such as a generic message or a task for your team. An empty None branch is fine only when doing nothing is genuinely the right result.
When an If/Else checks its conditions
An If/Else checks the contact once, at the exact moment they reach it. It does not wait. If you check “has booked appointment” one second after sending the booking link, the answer will always be no. That is why the step before an If/Else is usually a wait: wait one day, then check whether they booked. If the data might not be written yet, a short wait also protects you from reading an empty field.
Order your branches from most specific to most general and keep each one easy to read in the logs. “Has tag commercial AND budget field is not empty” is a branch. “Everyone from Facebook” is another. When a branch condition needs a dropdown value, note that some select fields match on the option’s ID rather than its display label, so test the branch with a real contact before trusting it.
What a goal event does
A Goal Event is a finish line inside the workflow. You choose the goal type, such as Form Submitted, Appointment Status, Contact Tag Added or Removed, Clicked a Trigger Link, Email Events, Payment Received, Invoice Paid, Document Status or User Replied. HighLevel watches for it constantly, and the moment a contact meets it, they jump to the goal step from wherever they are in the workflow and continue with the actions below it.
This is what makes long follow-up sequences safe. Instead of adding an If/Else “did they book?” after every single message, you place one goal event near the bottom: Appointment Status on your consult calendar. A lead who books on day two skips every remaining chaser and goes straight to the booked actions. Each workflow can have only one goal event, but that goal can include several criteria, which work as OR.
What happens to contacts who reach the goal without meeting it
Contacts who walk down the normal path and arrive at the goal step without having met it need a rule. HighLevel offers three: End this workflow, Continue anyway or Wait until the goal is met. For a booking goal, End this workflow is usually right: they finished every follow-up and never booked, so they leave, often with a tag that moves them into a long-term nurture.
Wait until the goal is met suits workflows where the goal will eventually happen, such as waiting for an invoice to be paid before sending onboarding. Continue anyway is useful when the steps after the goal should run for everyone. One more rule: a contact is checked against the goal only once per run, and later changes, such as a rescheduled appointment, do not reverse their progress.
Which Workflow Settings Should You Change Before Publishing?
Open the Settings tab at the top of the builder. These options apply to the whole workflow, and in our audits they cause more problems than any trigger or action, simply because nobody opened the tab.
Allow Re-entry
When Allow Re-entry is on, a contact can enter the workflow again after they finish it or are removed. When it is off, they can go through it only once, ever. A contact who is still active in the workflow cannot re-enter either way. Workflows with appointment or invoice triggers always allow one run per appointment or invoice, regardless of this setting.
Turn it on for workflows that should run every time the event happens: a quote request form people may submit again next year, a no-show recovery flow, a payment receipt. Leave it off for one-time journeys such as a welcome series or a lead magnet delivery. If you are unsure, ask yourself whether a contact doing this twice should get the messages twice.
Allow multiple Opportunities
Allow multiple Opportunities decides what happens when one contact has several opportunities that match an opportunity trigger such as Pipeline Stage Changed. On, each opportunity gets its own run through the workflow. Off, the contact enters only for the first matching opportunity. New workflows have it on by default.
This matters most for businesses that sell more than one job to the same customer: a roofer who quotes a repair and a gutter replacement separately, or an agency with several projects per client. Leave it on if each deal deserves its own follow-up. Turn it off if the messages are about the person, not the deal, and two copies would confuse them.
Stop on Response
Stop on Response removes the contact from the workflow when they reply to any message the workflow sent, on any channel the workflow uses. It is a simple way to stop a follow-up sequence once a human conversation starts, and for basic nurture sequences it is often the right choice.
It also breaks things. If your workflow uses a wait for the contact to reply, or an If/Else that checks for a reply, Stop on Response will remove the contact before those steps can do their job. It also removes them before any goal event, so a lead who replies “booked it, thanks” will skip your booked actions. Use one approach or the other, not both. If the workflow includes calls, note that voicemail settings on the Call action can change what counts as a response.
Timezone and Time Window
Timezone can be the account’s timezone or the contact’s own timezone, falling back to the account when the contact has none. Time Window lets you set a start time, end time and the days of the week when communication actions can run. Messages scheduled outside the window pause and go out at the next open slot. The window only governs communication actions, so internal actions such as tags and field updates are not held by it.
The window uses the same hours for every selected day, so you cannot set shorter hours on Saturday inside one workflow. Think about the trade-off before you turn it on: a lead who submits a form at 10 p.m. will not get your instant text until the window opens. Some businesses accept that, others keep the instant reply in a separate workflow with no window. Some US states also restrict when businesses can send marketing texts, so check the rules for where your contacts live.
Sender details and Mark as Read
Sender Details sets the default from name, from email and from number for the whole workflow. If your sub-account has dedicated sending domains, you can pick one here. Settings on an individual Send Email action override these defaults, and HighLevel warns you if the from email does not match the chosen sending domain, because that mismatch can hurt deliverability.
Conversations: Mark as Read controls whether conversations that only contain workflow messages show as unread in the inbox. By default they show as unread, which floods the inbox for busy accounts. Turn it on for informational workflows such as receipts and reminders, and leave it off for lead workflows where you want a person to see the thread.
Walkthrough: How to Build a Form Submitted to Booked Call Workflow
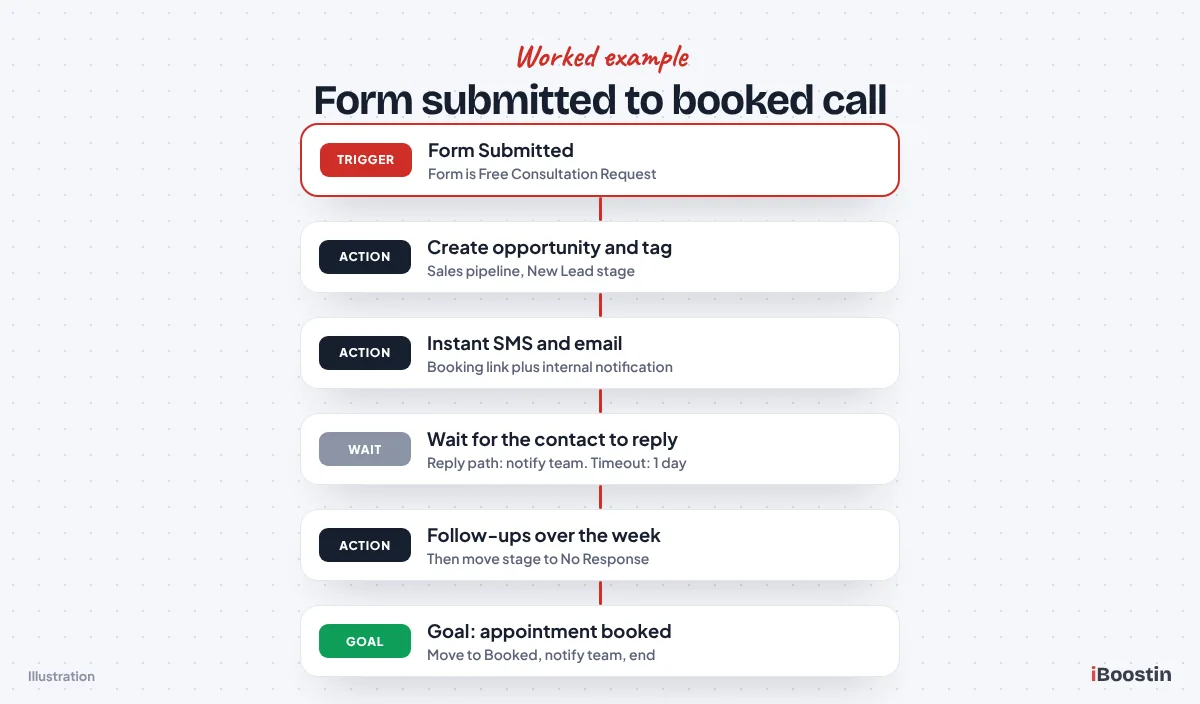
Now let us build one complete workflow, the same structure we use for service businesses that sell through a free consultation or estimate call. The goal: when someone submits the consultation form, they get an instant reply with a booking link, the lead lands in the pipeline, your team is told, follow-ups run until they book or go quiet, and the moment they book, everything switches to “booked” mode.
Before you start, make sure you have a form named something like “Free Consultation Request”, a calendar for the calls, a “Sales” pipeline with stages such as New Lead, Booked and No Response, and a working sending number and email domain. If any of that is missing, our guide on how to set up GoHighLevel from scratch covers the groundwork in order.
Step 1: Create the workflow and name it
Go to Automation, open Workflows, click Create Workflow and start from scratch. Rename it straight away using a clear pattern, for example “LEAD | Consult form to booked call | v1”. Save it into a “Leads” folder so it sits next to the other lead workflows.
The name matters more than it seems. Six months from now, this workflow will show up in a contact’s history, in an execution log and in a list of forty others. A name that says what starts it and what it is for lets anyone on your team understand it without opening the canvas.
Step 2: Add the Form Submitted trigger
Click Add New Trigger, choose Form Submitted and name the trigger “Consult form submitted”. Add the filter Form Is and select “Free Consultation Request”. If you also run Facebook lead ads for the same offer, add a second trigger, Facebook Lead Form Submitted, filtered to that lead form.
Save the trigger and look at the canvas. You should see one or two triggers at the top feeding into an empty line. If you added two triggers, both will enroll contacts into the same steps, so the messages you write next need to make sense for both sources. Avoid wording like “thanks for filling in the form on our website” if some leads came from an ad.
Step 3: Put the lead in the pipeline and tag it
Add a short wait of one minute, then Create/Update Opportunity: choose the Sales pipeline, the New Lead stage, and name the opportunity with the contact’s name and the service. Then add Add Contact Tag with a tag such as “lead-consult-form” and Assign to User if leads go to a specific salesperson or a round robin.
This is the step most DIY builds skip, and it is why their pipelines are always out of date. Once it is in place, every form lead appears in the New Lead column within a minute, with an owner and a tag you can filter on. Your reporting, smart lists and later workflows all depend on this data being there.
Step 4: Send the instant SMS and email
Add Send SMS with a short, human message: “Hi {{contact.first_name}}, thanks for reaching out to [Business]. You can pick a time for your free consultation here: [booking link]. Or reply to this text with any questions. [Your name]”. Then add Send Email with the same offer, a clear subject line and the booking link as a button.
For the booking link, copy your calendar’s link from the calendar settings, or better, save it as a custom value and insert the custom value. When the link changes later, you update it in one place instead of in every workflow. Keep the first text under two short sentences plus the link. Long first messages look automated, and the goal is to get a reply or a booking, not to explain everything.
Step 5: Notify your team and add a call task
Add Send Internal Notification to the assigned user, by SMS or in-app notification, with the lead’s name, phone, the service they picked and the line “Call within 15 minutes”. Then add Add Task for the same user: “Call {{contact.first_name}} about consult request”, due within the hour.
Speed to lead still matters most in a booked-call business, and automation should push your team to call, not replace the call. The task also gives your manager a simple daily check: any open “call new lead” tasks past due means someone is not following up, and you can see it without opening a single report.
Step 6: Wait for a reply, with a timeout
Add a Wait and choose The contact to reply, channel SMS. Turn on Timeout and set it to one day. You now have two branches: a reply branch and a timeout branch. On the reply branch, add an internal notification (“Lead replied, check the conversation”) and end the path there, because a person should take over the conversation now.
This is why Stop on Response stays off for this workflow. The reply wait already handles responders in a smarter way: instead of silently dropping them, it alerts your team and stops the sequence for that person. Remember that if a team member texts the lead by hand while they are waiting here, the reply might not be matched, so the team should check the conversation before texting.
Step 7: Build the follow-up path for non-responders
On the timeout branch, add a second Send SMS: “Hi {{contact.first_name}}, just checking you saw the booking link for your free consultation. Here it is again: [link]”. Then a Wait of two days with Advance Window set to weekdays during business hours, followed by a Send Email with a different angle, such as a short answer to the most common question you get.
Finish the path with one more wait, then Create/Update Opportunity to move the deal to “No Response” and Add Contact Tag “nurture-long-term” so a separate long-term nurture can pick them up. Three or four touches over about a week is plenty for most service leads. More than that and you start to annoy people who are simply not ready yet.
Step 8: Add the goal event for booked appointments
At the very bottom of the workflow, add a Goal Event. Choose Appointment Status and select the booked statuses (for example new or confirmed), narrowing it to your consultation calendar where the option is shown. Under what to do if a contact reaches the goal without meeting it, choose End this workflow. Now any lead who books at any point jumps straight here.
Under the goal, add the booked actions: Create/Update Opportunity to move the deal to “Booked”, Remove Contact Tag “lead-consult-form”, Remove from Workflow for any other lead or nurture workflows they might be in, and a final Send Internal Notification: “Consult booked: {{contact.first_name}}”. Your separate appointment reminder workflow, triggered by Customer Booked Appointment, handles confirmations and reminders from here.
Step 9: Set the workflow settings
Open Settings. Turn Allow Re-entry on, because a past lead may come back months later and fill in the form again. Leave Stop on Response off, since the reply wait handles responders. Set Timezone to the contact’s timezone, and decide on the Time Window: we often leave it off here so the instant reply goes out even at night, and rely on Advance Window on the follow-up waits instead.
Under Sender Details, set the from name to a real person at the business, the from email on your dedicated sending domain and the from number you registered for texting. Click Save. The workflow is still in Draft, which means nothing runs yet. That is exactly where it should be until it passes testing.
How Do You Test and Publish a Workflow?
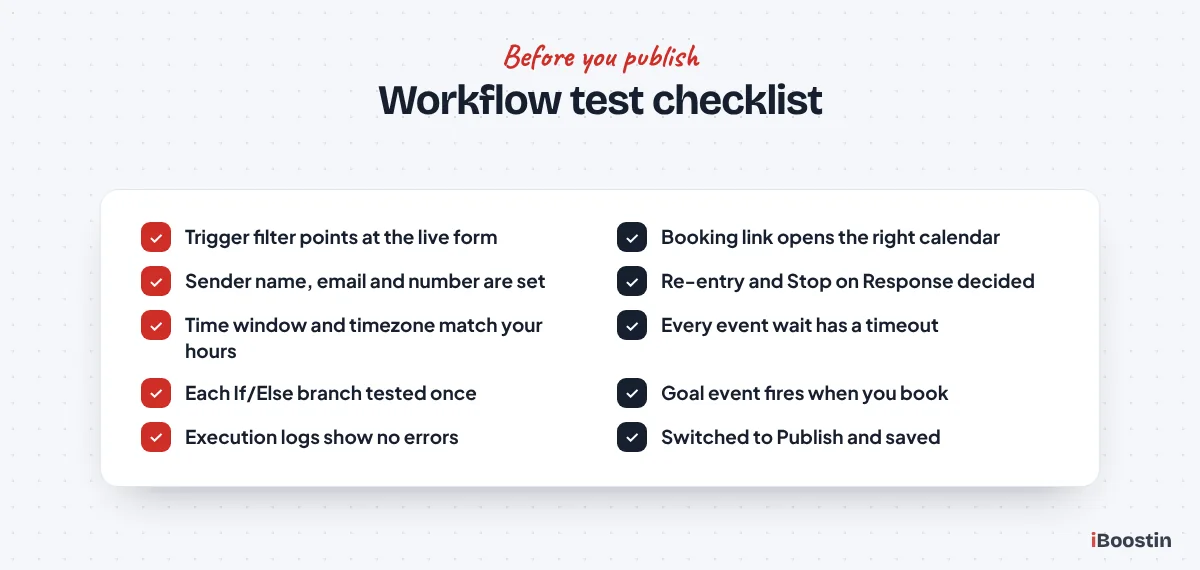
Testing is the step that separates workflows that work from workflows that seem to work. HighLevel gives you a built-in test, but the only test we fully trust is a live run with a real contact you control, followed by a slow read of the logs.
Using the Test Workflow button
In the top right of the builder, click Test Workflow, select a contact and click Run Test. Use a contact that is you or a team member, with your own phone number and email, and assume the test sends real messages. If the test fails right away, the usual cause is an incomplete trigger or action, such as a missing form filter or an empty message.
HighLevel’s own documentation says testing with a contact is not perfect, especially when you reuse the same contact, and it recommends publishing and testing live as well. The test button is good for catching configuration errors and checking how messages look. It is not a full simulation of waits, replies and goal events over several days.
Running a live test with your own contact
Switch the workflow to Publish, click Save, then go to your actual form and submit it as a new contact using a fresh email address and your own phone. Watch what happens in real time: the text, the email, the pipeline card, the notification and the task. Reply to the text to test the reply branch. On a second test contact, do not reply, then book a call through the link to test the goal event.
For long waits, temporarily shorten them to a few minutes on a copy of the workflow, or test the branches one at a time. Then set the real timing back before you let real leads in. Delete or tag your test contacts afterwards so they do not pollute reports. This takes 30 minutes and catches the problems that would otherwise surface with a paying customer.
Reading Execution Logs and Enrollment History
Execution Logs show each action a contact went through, with the time it ran and a status, plus a link to view details when something failed. You can filter by action and date. Enrollment History shows each time a contact entered and why they left: workflow completed, removed by a workflow action, or removed by an action in another workflow.
The most useful tool here is the option to highlight the contact’s path, which opens the builder with their route marked, including skipped steps and errors. When a client tells us “the lead never got the text”, this is the first place we look. In most cases the log answers it in a minute: the contact went down the None branch, sat in a paused time window, or was removed by another workflow.
Editing a published workflow safely
You can edit a workflow while it is live, and changes apply to upcoming steps for contacts already inside. Contacts already sitting in a wait keep the wait they started with. The History icon at the top shows earlier versions, so you can see what changed and when. Switching to Draft stops new enrollments and actions, and contacts in waits stay where they are until you publish again.
For anything bigger than a wording change, our rule is to duplicate the workflow, make the changes in the copy, test the copy, then switch traffic over by moving the trigger. Restructuring branches in a live workflow with contacts waiting inside is how people end up with leads stuck at steps that no longer exist.
How Should You Name and Organize Workflows?
An account with five workflows does not need a system. An account with fifty does, and every account gets to fifty faster than you expect. Naming and folders cost nothing to set up on day one and are painful to fix later.
A naming pattern that scales
We use one pattern in every account: CATEGORY | trigger or purpose | version. For example “LEAD | Consult form to booked call | v1”, “APPT | Reminders 24h and 2h | v2”, “SALES | Quote sent follow-up | v1”, “REVIEW | Request after showed | v1”. The category in capitals sorts workflows together in lists, the middle part says what starts it and the version tells you which copy is current.
Name the triggers and actions inside the workflow too. “Send SMS” tells you nothing in a log. “SMS 1: instant reply with booking link” tells you exactly where the contact is. HighLevel shows your action names in the execution logs, so clear names turn a confusing log into a readable story of what happened to each lead.
Folders and archiving
On the Workflows page, use Create Folder to group workflows, and the three-dot menu on any workflow to Move To Folder. Folders can be nested, but HighLevel recommends keeping it to two or three levels. We usually create folders by stage of the customer journey: Leads, Appointments, Sales, Customers, Reviews, Internal, and an Archive folder.
Deleting a folder does not delete the workflows inside it. They move up one level. When you replace a workflow with a new version, switch the old one to Draft, rename it with “OLD” at the front and move it into Archive instead of deleting it, at least until the new version has run cleanly for a few weeks. That way you can still see its logs and copy pieces back if you need them.
Documenting what each workflow does
Keep a simple list outside HighLevel, a shared doc or spreadsheet, with every published workflow, its trigger, what it does, which other workflows it starts or stops, and who owns it. It takes a few minutes per workflow and becomes the map everyone uses when something goes wrong.
The list also exposes overlap. When you write down that three different workflows all start on Form Submitted for the same form, you have found the reason leads get three texts. For agencies, this document is also part of a proper client handover and the first thing to update after any change. Once you have the basics working, our list of GoHighLevel workflow examples gives you twenty proven structures to build next, and a missed call text back workflow is usually the best second build after your lead reply.
What Mistakes Break GoHighLevel Workflows?
Almost every broken workflow we are asked to fix comes down to one of a short list of mistakes. None of them are bugs. They are settings and logic that made sense to the builder and do something different in practice.
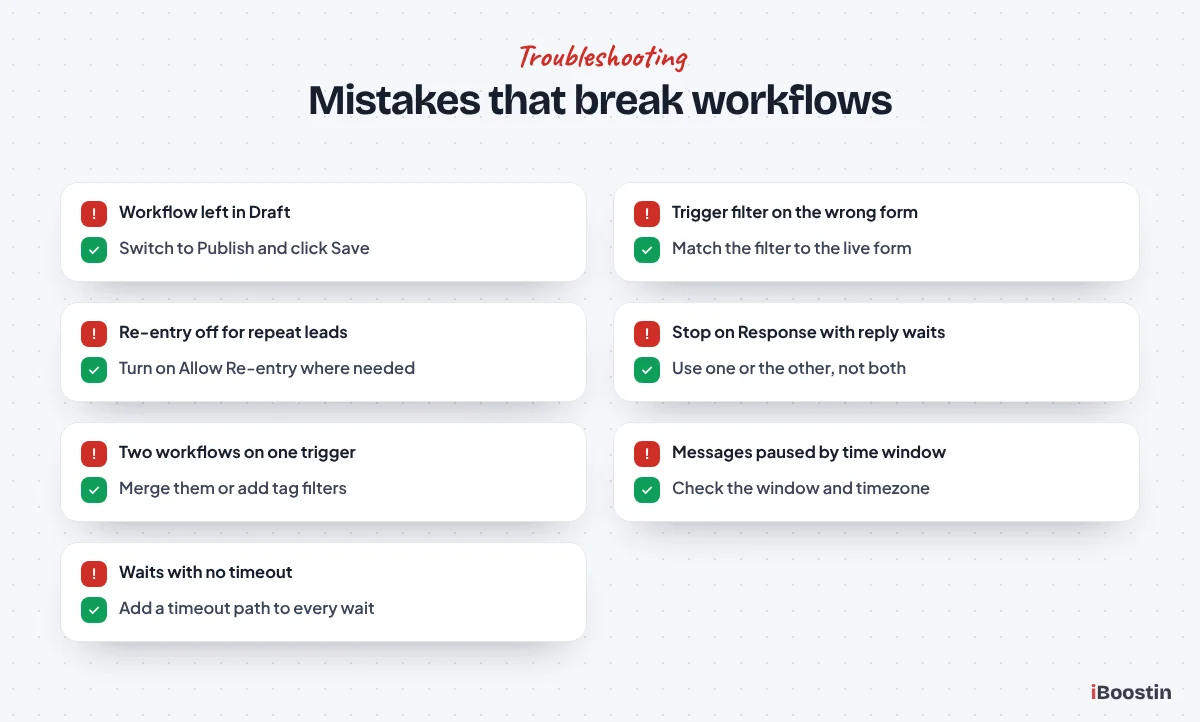
- Left in Draft or not saved. The toggle says Draft, or there is a red dot next to Save. Draft workflows do not enroll anyone. Check both every time you finish editing.
- Wrong or missing trigger filter. The trigger watches the wrong form, the wrong calendar or every form. Open each trigger and confirm the filter matches the live asset, not an old copy.
- Re-entry off when it should be on. A returning lead submits the form again and nothing happens, because they completed this workflow last year. Decide on re-entry for every workflow, do not leave the default by accident.
- Stop on Response fighting your reply logic. The contact replies, gets removed, and never reaches your reply branch or goal. Use Stop on Response or reply waits, not both.
- Two workflows on the same trigger. An old template and a new build both start on the same form, so leads get doubled messages. Search your workflows by trigger before you publish a new one.
- Messages paused by the time window. The workflow runs, but the text waits until 9 a.m. because of the window, or goes out in the wrong timezone. Check Settings and the contact’s timezone in the logs.
- Waits with no timeout. Contacts sit in a condition or reply wait forever. Every event wait should have a timeout path.
- Sending blocked outside the workflow. The workflow is fine, but texts fail because A2P registration is incomplete, or emails bounce because of domain setup. The execution log shows the error on the send step.
When a workflow seems to do nothing at all, work through our full troubleshooting guide on why a GoHighLevel workflow is not triggering. It covers twelve causes in the order we check them, with the exact screen to open for each.
Should You Build Workflows Yourself or Get Help?
Building your own workflows is very doable. If you have a handful of simple automations to set up (an instant lead reply, appointment reminders, a review request) and you are willing to spend a few evenings learning the builder and testing properly, you will end up with a system you understand deeply. That understanding is worth a lot when something needs to change later.
Getting help makes sense in a few situations: leads are already coming in and every day of broken follow-up costs you bookings, your account has inherited workflows from a template or an old agency and nobody knows what fires what, or you need branching logic, webhooks or multiple pipelines working together. It also makes sense when your time is better spent selling. Our team can build and test your workflows for you, or if the bigger problem is fixing an account that already exists, a GoHighLevel automation expert can audit and repair what is there.
| Build it yourself | Get expert help | |
|---|---|---|
| Best for | Simple flows, owners who like learning tools | Live lead flow, complex logic, inherited accounts |
| Time to working workflows | Several evenings of building and testing | Usually days, after a short planning call |
| Main risk | Untested branches and settings left on default | Choosing someone who does not document their work |
| What you end up with | Deep understanding of your own system | Tested workflows, naming, folders and handover notes |
If you hire, keep admin access to your own account, ask to see the test results for every branch, and get a written list of what was built and what each workflow does. A good GoHighLevel expert will be happy to show you the execution logs from their testing and walk you through the canvas, so you are never locked out of understanding your own system.
Frequently Asked Questions About Building Workflows in GoHighLevel
How do I create a workflow in GoHighLevel?
Open the sub-account, click Automation in the left menu and go to the Workflows tab. Click Create Workflow and start from scratch, from a template or with the AI builder. Add a trigger with filters, add your actions with the plus button, check the Settings tab, then save, test with your own contact and switch the toggle from Draft to Publish.
What is the difference between a trigger and an action in GoHighLevel?
A trigger is the event that starts the workflow for a contact, such as a form submission, a new tag or a booked appointment. An action is something the workflow does after that, such as sending a text, updating a field, moving a deal in the pipeline or notifying your team. Every workflow has at least one trigger and usually several actions.
Can a GoHighLevel workflow have more than one trigger?
Yes. You can add several triggers to one workflow, and each one enrolls contacts on its own when its conditions are met. They work as OR, so a contact only needs to match one. This is useful when leads from a website form, a Facebook lead form and a manual tag should all receive the same follow-up sequence.
How do I test a workflow in GoHighLevel before going live?
Click Test Workflow in the top right of the builder, choose a contact you control and click Run Test. Then publish the workflow and run a live test by submitting the real form as a new contact. Check every message, pipeline update and notification, and read the Execution Logs to confirm each step ran as expected.
What does Allow Re-entry mean in GoHighLevel workflows?
Allow Re-entry lets a contact go through the same workflow again after they have finished it or been removed. With it off, each contact can complete the workflow only once. A contact who is still active inside the workflow cannot re-enter either way, and appointment or invoice triggers allow one run per appointment or invoice regardless of the setting.
What is a goal event in a GoHighLevel workflow?
A goal event is a step that watches for a result, such as a booked appointment, a form submission, a tag or a payment. When a contact meets it, they jump to the goal from wherever they are in the workflow and skip the remaining follow-ups. Each workflow can have one goal event, which may include several criteria.
Why is my GoHighLevel workflow not working?
The most common causes are a workflow left in Draft, a trigger filter pointing at the wrong form or calendar, re-entry turned off, Stop on Response removing contacts early, or a time window pausing messages. Open the Execution Logs and Enrollment History for a test contact to see exactly which step ran, was skipped or failed.
Can the GoHighLevel AI builder create workflows for me?
Yes. The Workflow AI builder turns a plain-English description into a draft workflow with triggers, actions and branches, and it can use your existing forms, tags and pipelines. HighLevel says AI-built workflows still need manual review and the AI cannot test them, so check every step and run a live test before publishing.
Start Building Workflows That Book Calls
Every good GoHighLevel workflow follows the same pattern: a filtered trigger, a few clear actions, waits that respect the contact’s time, branches that send people down the right path, a goal that catches the win, and settings chosen on purpose. Build one workflow properly with that pattern, test it with your own phone, and the next ten get much easier.
Start with the form to booked call workflow from this guide, because it touches every piece of the builder and pays for itself the first week a lead books without anyone chasing them. If you would rather have it built, tested and documented in your account by people who do this every week, we are happy to help.